Introduction
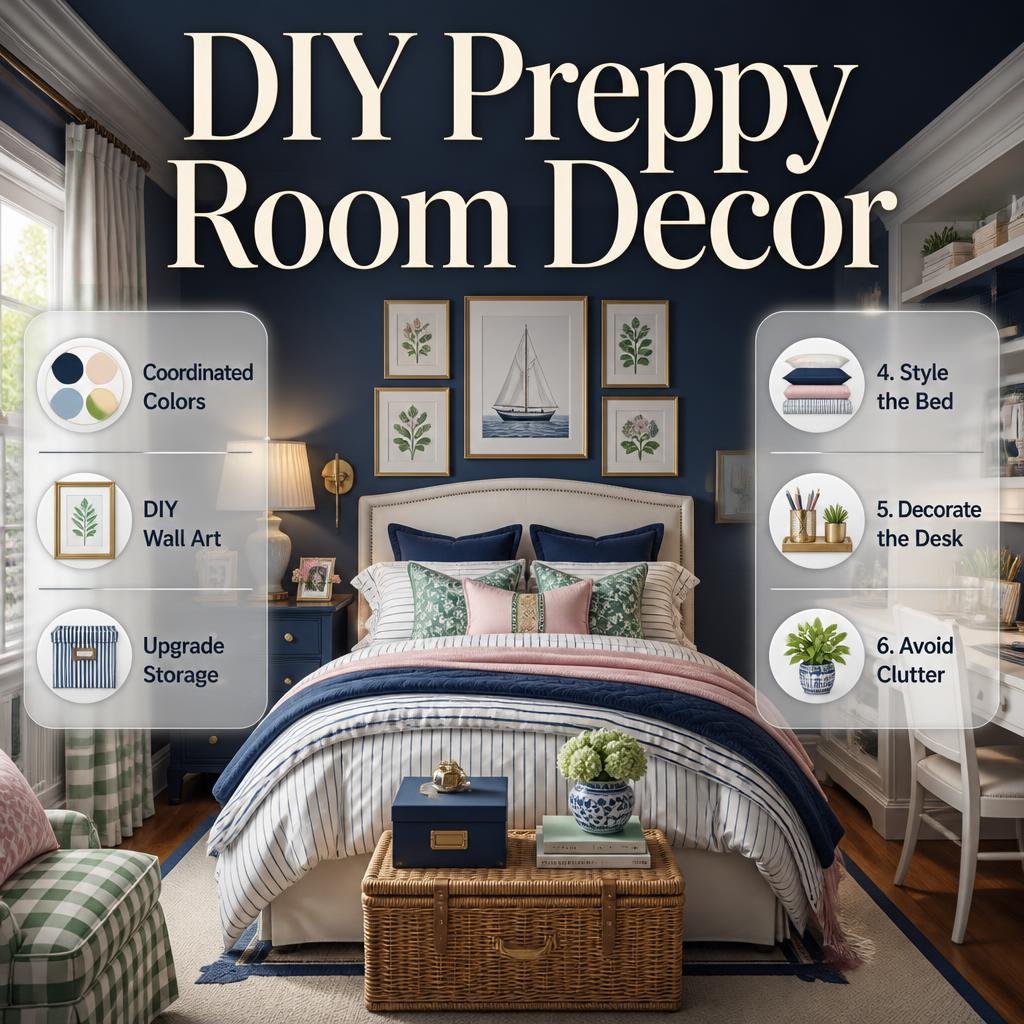
DIY Preppy Room Decor | A beautiful preppy room doesn’t have to come from an expensive furniture set or a complete bedroom renovation. Sometimes, the biggest transformation starts with a plain picture frame, an old storage box, a simple cushion, or a blank wall that needs a little personality.
If you want your bedroom to feel polished, colorful, organized, and personal without spending a fortune, DIY preppy room decor can give you a practical place to start. Instead of buying every decorative piece, you can customize what you already own and create small details that fit your preferred colors, patterns, and personality.
The idea behind Preppy Room style is not simply filling a bedroom with navy stripes, floral prints, or decorative accessories. A successful room feels coordinated. Colors repeat naturally, patterns have different scales, furniture remains functional, and personal details make the space feel like yours.
This guide takes you through the entire process, from choosing a preppy color palette and planning your DIY projects to creating wall art, upgrading storage, styling your bed, mixing patterns, decorating a desk, and avoiding the mistakes that can make a room feel cluttered.
Whether you want a classic navy-and-white bedroom, a soft pink space, a cozy room, a colorful teenage bedroom, or a more minimal interpretation of preppy style, you’ll find practical ideas here that can be adapted to your budget and existing furniture.
What Is DIY Preppy Room Decor?
DIY preppy room decor is the process of creating, customizing, refreshing, or repurposing decorative elements while using the visual characteristics associated with preppy interior design.
Instead of purchasing an entire matching bedroom collection, you can create a coordinated room by combining simple DIY projects with furniture and accessories you already own.
Typical preppy elements include:
- Stripes
- Gingham
- Plaid
- Checks
- Floral patterns
- Navy
- White
- Cream
- Light blue
- Soft green
- Pink
- Red
- Brass or gold-toned accents
- Classic furniture shapes
- Layered bedding
- Framed artwork
- Decorative storage
- Personalized accessories
The important part is balance.
A room doesn’t become more preppy simply because you add more patterns. In fact, too many competing patterns can make the room feel chaotic. The goal is to create a visual relationship between your colors, furniture, textiles, artwork, and accessories.
For example, imagine a bedroom with white furniture, navy bedding, a small gingham cushion, a framed botanical print, a woven basket, and a simple brass-toned lamp. None of those pieces needs to be expensive or perfectly matched. They work because they share a controlled visual direction.
That is where DIY becomes useful.
Why Choose DIY Preppy Room Decor?
DIY decor gives you more control over the final result. You can choose the exact colors, patterns, sizes, and materials that work with your room instead of trying to find everything ready-made.
It can also be a practical solution when your furniture is still usable but your room feels outdated.
Instead of replacing a perfectly good dresser, you might refresh its handles. Instead of buying expensive wall art, you might create your own framed artwork. Instead of replacing every cushion, you might make or customize a few covers.
DIY decor can help you:
- Personalize a generic bedroom
- Refresh existing furniture
- Introduce your preferred colors
- Create coordinated accessories
- Make better use of inexpensive materials
- Reduce unnecessary purchases
- Add meaningful personal details
- Experiment with different preppy styles
- Refresh your room gradually
The biggest advantage is flexibility.
You can make one change today and another next month without having to redesign the entire room.
How Do You Start a DIY Preppy Room?
The easiest way to begin is to plan the room before starting the projects.
Many decorating problems happen because people start buying craft supplies before deciding what the room actually needs.
Instead, walk around the bedroom and ask:
- What looks unfinished?
- What looks outdated?
- Where is clutter accumulating?
- Which colors already exist?
- Which furniture should stay?
- Which surfaces need better organization?
- Which wall needs attention?
- Does the bed need more visual layering?
- Is the room too plain or too busy?
Then choose only a few projects.
A simple process looks like this:
Assess → Declutter → Choose Colors → Plan → DIY → Style → Edit
This prevents you from creating several unrelated decorations that don’t work together.
Start With What You Already Own
Before buying anything, collect your existing:
- Frames
- Cushions
- Baskets
- Books
- Small trays
- Lamps
- Storage boxes
- Artwork
- Decorative objects
- Fabric
- Desk accessories
You may discover that you already have enough pieces to create a noticeable transformation.
Create a Simple Mood Direction
You don’t need a professional design board.
Simply choose three to five visual words.
For example:
Classic + Fresh + Organized + Soft
Or:
Colorful + Playful + Clean + Cozy
Those words can guide your decisions when choosing DIY projects.
What Colors Work Best for a DIY Preppy Room?
There is no single required preppy color palette. The style can range from traditional navy and white to soft pastels, green and cream, pink and white, or red and navy.
The easiest approach is to establish a visual hierarchy.
Use This Simple Color Formula
Main color: approximately the largest visual presence
Supporting color: repeated through bedding, furniture, or accessories
Accent color: used in smaller decorative details
For example:
Navy + White + Brass
Or:
Light Blue + Cream + Sage
Or:
Pink + White + Navy
Or:
Green + Cream + Natural Wood
The room doesn’t need to follow exact percentages. The purpose is simply to stop every color from competing equally.
For additional guidance on combining shades, see Coordinated Colors.
DIY Navy and White Preppy Room Decor
Navy and white is an especially flexible combination for DIY decorating because it can feel classic, coastal, modern, or youthful depending on the patterns and materials you choose.
Try creating:
- Navy picture frames
- White canvas art
- Navy-and-white striped cushions
- Simple geometric artwork
- Navy storage boxes
- White fabric-covered bulletin boards
- Navy decorative trays
If you want more inspiration for this palette, explore Navy and White Preppy Room Ideas.
A Simple Navy-and-White DIY Formula
Start with white as the background.
Add navy through:
- Bedding
- Pillows
- Artwork
- A small rug
- Storage
- Desk accessories
Then introduce a small amount of warmth through natural wood or brass-toned details.
This prevents the room from becoming visually cold.
DIY Blue and Cream Preppy Decor
Blue and cream creates a softer alternative to a sharp navy-and-white scheme.
Cream can be used for:
- Curtains
- Bedding
- Wall art backgrounds
- Lampshades
- Storage
- Upholstery
Blue can appear in:
- Cushions
- Frames
- Artwork
- Throws
- Decorative objects
For a room built around this softer relationship, explore Blue and Cream Preppy Room.
A useful DIY project is to take a plain cream cushion and add a simple blue trim or pattern. Small repeated details can make the entire room feel more coordinated.
DIY Pink and White Preppy Room Decor
Pink and white can create a cheerful, soft, and youthful preppy room without making the entire bedroom overwhelmingly pink.
Use white as the visual foundation and introduce pink through smaller pieces.
Good DIY projects include:
- Pink picture frames
- Pink-and-white artwork
- Fabric-covered storage
- Cushion covers
- Small decorative trays
- Personalized wall art
For more color combinations and room inspiration, see Pink and White Preppy Room Ideas.
You can also explore a dedicated Pink Preppy Room direction if you want pink to play a larger role.
DIY Green and Cream Preppy Room Decor
Green and cream is useful when you want a calmer, more natural interpretation of preppy design.
Instead of bright green everywhere, consider:
- Sage
- Olive
- Soft botanical green
- Muted forest green
DIY possibilities include:
- Botanical wall art
- Green-painted frames
- Fabric storage boxes
- Cream cushions with green patterns
- Small plant displays
- Green-and-cream decorative trays
For more inspiration, visit Green and Cream Preppy Room Ideas.
DIY Red and Navy Preppy Decor
Red and navy can create a stronger and more traditional-looking room, but these colors need careful balance.
If both colors are intense, use white or cream to create breathing space.
Try:
- Navy frames with red artwork
- Red-and-navy plaid cushions
- Simple striped artwork
- Navy storage with small red details
- Red decorative books or accessories
See Red and Navy Preppy Room Ideas for additional inspiration.
The goal is not to make every object red or navy. Instead, repeat the two colors naturally throughout the room.
20+ Easy DIY Preppy Room Decor Ideas

Now that your color direction is clear, you can begin choosing projects.
You don’t need to complete every idea. Select the ones that solve actual problems in your room.
1. Create a DIY Preppy Gallery Wall
A gallery wall is one of the easiest ways to personalize a blank bedroom wall.
You can combine:
- Photographs
- Botanical artwork
- Simple illustrations
- Geometric designs
- Initial-inspired artwork
- Small mirrors
- Meaningful prints
Use frames in one or two finishes to create consistency.
For example, white frames can create a light appearance, while navy frames can make the display more graphic. Brass-toned frames can add warmth.
How to Plan It
Place the frames on the floor first.
Move them around until the arrangement feels balanced.
Then photograph the arrangement so you have a reference when hanging them.
💡 Pro Tip: Don’t make every piece the same size. A combination of large, medium, and small frames usually creates more visual interest.
2. Make Your Own Preppy Wall Art
You don’t need advanced artistic skills to make attractive wall art.
Simple designs can work extremely well.
Try:
- Navy stripes on white paper
- Repeating geometric shapes
- Minimal floral outlines
- Abstract color blocks
- Gingham-inspired patterns
- Simple botanical silhouettes
The secret is to use colors already present in the room.
If your bedding is navy and cream, create artwork using those same shades.
That connection makes the DIY piece feel intentional.
3. Transform Plain Picture Frames
Old frames are excellent DIY materials.
You can:
- Repaint them
- Add a simple border
- Change the artwork
- Group them together
- Use several in matching colors
For a classic room, navy, white, cream, or brass-toned finishes can work well.
For a softer room, consider pale blue, sage, or blush.
⚠ Common Mistake: Don’t repaint every frame in a completely different color. Too many unrelated finishes can make the gallery wall feel disconnected.
4. Create a DIY Bulletin Board
A bulletin board can combine organization and decoration.
Cover the board with fabric that matches your room.
Then use it for:
- Photos
- Notes
- Study reminders
- Postcards
- Small prints
- Inspiration images
Choose a limited selection instead of covering every inch.
This keeps the display decorative rather than messy.
5. Customize a Storage Basket
Storage is often overlooked when decorating.
A plain basket can become part of the room’s design with a few simple adjustments.
You could add:
- Fabric lining
- A ribbon detail
- A small decorative tag
- Coordinated trim
- A painted section
Use it for:
- Blankets
- Books
- Accessories
- Hair items
- Study supplies
This is particularly useful in a small room where storage needs to look attractive as well as practical.
6. Make DIY Decorative Trays
A decorative tray can organize small objects while making a surface look more finished.
Use one on:
- A nightstand
- Dresser
- Desk
- Vanity
- Shelf
Place only a few objects inside.
For example:
Tray + small lamp + book + decorative object
This creates organization without visual clutter.
7. Refresh Your Desk Accessories
A preppy desk can look polished without being expensive.
Customize:
- Pen holders
- Small storage boxes
- File organizers
- Pencil cups
- Notebook covers
- Small trays
Choose one or two colors from the bedroom palette.
For example, a navy-and-white bedroom could use white desk organizers with navy details.
If you want a cleaner overall aesthetic, Minimal Preppy Room provides a useful direction for controlling decorative clutter.
8. Make Simple Preppy Pillow Covers
Pillows are one of the easiest ways to introduce pattern.
You can work with:
- Stripes
- Gingham
- Plaid
- Floral prints
- Small geometric patterns
The most important thing is pattern scale.
Try:
Large pattern + medium pattern + small pattern + solid
For example:
- Large striped bedding
- Medium floral pillow
- Small gingham cushion
- Solid cream pillow
This creates variety without making everything compete.
9. Create a DIY Reading Corner
A reading corner doesn’t need to be large.
You need:
- Comfortable seating
- Small table
- Lamp
- Throw
- One or two decorative elements
Add a DIY framed print or customized cushion to connect the corner with the rest of the bedroom.
For a warmer atmosphere, explore Cozy Preppy Room.
10. Make a Personalized Decorative Sign
Instead of purchasing generic wall decorations, create something meaningful.
You might use:
- Initials
- A favorite phrase
- A simple date
- A personal symbol
- A minimal monogram-inspired design
Keep the typography or design simple so it feels like part of the room rather than a separate craft project.
11. DIY a Fabric-Covered Storage Box
A cardboard or basic storage box can become attractive with fabric or decorative paper.
Use it for:
- Letters
- Accessories
- Small electronics
- Craft materials
- Keepsakes
Choose a pattern that appears elsewhere in the room.
This creates repetition without requiring identical products.
12. Refresh a Small Side Table
If you already have a basic side table, consider whether it needs replacement or simply a visual refresh.
Possible changes include:
- Cleaning and refinishing
- Changing handles
- Repainting
- Adding a tray
- Styling the top surface
Don’t overcrowd it.
A lamp, book, and one decorative item may be enough.
13. Create a DIY Patterned Lampshade Accent
A lampshade can become a subtle decorative feature.
If you’re working with fabric or decorative materials, make sure the material is appropriate for the lamp and doesn’t interfere with safe operation.
The visual goal can be simple:
Plain lamp + coordinated shade detail = personalized lighting
Avoid complicated modifications to electrical components.
14. Make DIY Shelf Decor
Open shelves can easily become cluttered.
Instead of placing an object on every available section, combine:
- Books
- Framed art
- Small plants
- Decorative boxes
- Small accessories
Leave some empty space.
Empty space is part of the design.
15. Create a DIY Color-Coordinated Book Display
Books can become decorative elements when arranged intentionally.
Try grouping them by:
- Color
- Size
- Topic
- Cover appearance
You can also place a small decorative object on top of a horizontal stack.
The purpose isn’t to make books look artificial. Keep the arrangement practical enough that you can still use them.
16. Make Simple Botanical Artwork
Botanical designs work naturally with classic preppy colors.
You can create:
- Leaf outlines
- Pressed-flower-inspired artwork
- Simple botanical illustrations
- Green-and-cream prints
Pair botanical art with navy or natural wood frames for a traditional feel.
17. DIY a Small Vanity Tray
A tray can organize personal accessories while adding a polished detail.
Use it for:
- Hair accessories
- Jewelry
- Small decorative objects
- Perfume bottles
- Everyday items
Keep the number of objects controlled.
A tray should organize clutter, not become a container for more clutter.
18. Create a DIY Seasonal Decor Collection
Instead of constantly changing the whole bedroom, make a small box of seasonal accessories.
Spring
Use:
- Soft green
- Floral patterns
- Light fabrics
- Pastel artwork
Summer
Use:
- Light blue
- White
- Stripes
- Natural textures
Autumn
Use:
- Muted red
- Cream
- Warm textures
- Deeper green
Winter
Use:
- Navy
- Cream
- Soft textiles
- Warm lighting
This gives the room variety without requiring a complete makeover.
19. Make a DIY Photo Display
Personal photographs can make a room feel more authentic.
Use:
- Matching frames
- A simple photo grid
- Clips on a decorative board
- A small tabletop arrangement
Choose photos that mean something to you rather than selecting images simply because they match a color palette.
That personal connection is what makes a room feel lived-in.
20. Create a DIY Cozy Throw Arrangement
A throw blanket can add texture without becoming another complicated project.
Fold or casually drape it over:
- Bed
- Chair
- Bench
- Reading corner
Choose a color already present in the room.
For example, a cream throw can soften navy bedding.
21. Add DIY Greenery Displays
Plants can bring natural texture and color into a preppy bedroom.
If live plants aren’t practical, decorative botanical elements can create a similar visual effect.
Use:
- Small planters
- Simple vases
- Botanical prints
- Dried decorative elements where appropriate
Avoid filling every surface with greenery.
One or two intentional placements can be enough.
22. Create a DIY Accent Wall
A feature wall can become the visual center of the room.
Possible approaches include:
- Paint
- Removable wallpaper
- Simple pattern
- Framed artwork
- Decorative paneling
For a DIY-friendly approach, choose one wall rather than attempting to change every wall.
You can also explore Preppy Room Decor Ideas for broader styling inspiration.
23. Try Removable Preppy Wallpaper
If your space allows it, removable wallpaper can introduce a strong pattern without permanently changing the room.
Possible patterns include:
- Stripes
- Botanical designs
- Small geometric prints
- Delicate florals
Use wallpaper selectively.
A strong pattern across every wall may compete with bedding and accessories.
24. Create DIY Wall Paneling Details
Traditional paneling can add architectural character.
For a DIY project, careful measuring and planning are essential.
Before starting, determine:
- Wall dimensions
- Panel spacing
- Desired height
- Material requirements
- Finish
- Whether the change is suitable for your space
If you’re unsure about tools or installation, choose a simpler decorative alternative.
25. Customize Furniture Hardware
Sometimes furniture doesn’t need to be replaced.
Changing small hardware details can make a noticeable difference.
Consider:
- Drawer pulls
- Knobs
- Handles
Choose a finish that appears elsewhere in the room.
For example, repeating brass-toned details through drawer hardware, a lamp, and a frame can create visual continuity.
How Do You Mix Patterns in DIY Preppy Decor?
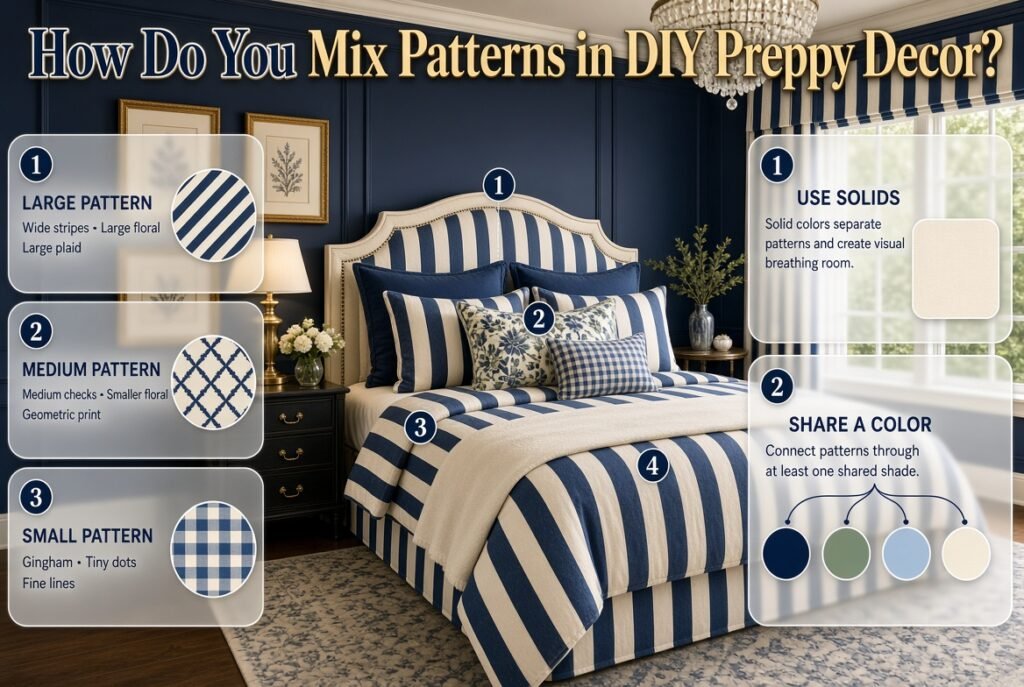
Pattern mixing is one of the most important parts of preppy styling, but it is also one of the easiest areas to get wrong.
The simplest method is to vary scale.
Imagine three pattern levels:
Large Pattern
Examples:
- Wide stripes
- Large floral
- Large plaid
Medium Pattern
Examples:
- Medium checks
- Smaller floral
- Medium geometric print
Small Pattern
Examples:
- Gingham
- Tiny dots
- Fine lines
Then use solid colors to separate them.
Example
Striped bedding
Floral cushion
Gingham accent
Solid cream throw
This creates visual hierarchy.
The colors can differ slightly, but they should share at least one connecting shade.
How Many Patterns Should a Preppy Room Have?
There isn’t a strict number, but beginners usually find it easier to work with two or three noticeable patterns.
For example:
- Stripes
- Gingham
- Floral
Then use solid colors throughout the rest of the room.
If you want a more detailed pattern-rich room, the key is to make sure each pattern has a different role.
One can dominate.
Another can support.
A third can appear only in small accents.
This is much easier to control than giving every pattern equal visual weight.
DIY Preppy Room Decor for a Classic Style
A classic preppy room usually benefits from traditional details and restrained colors.
Consider:
- Navy
- White
- Cream
- Natural wood
- Brass-toned accents
- Stripes
- Plaid
- Traditional artwork
DIY projects could include:
- Classic framed artwork
- Navy-painted frames
- Traditional fabric cushions
- Personalized book displays
- Decorative trays
- Refreshed furniture hardware
For more inspiration, see Classic Preppy Room.
A classic room generally benefits from restraint. Let the furniture and larger elements establish the style while DIY accessories provide personality.
DIY Modern Preppy Room Decor
Modern preppy design can combine traditional colors with simpler furniture and cleaner accessories.
Think:
Classic colors + clean shapes + fewer decorations
DIY ideas include:
- Minimal geometric artwork
- Simple color-blocked frames
- Modern storage boxes
- Clean-lined trays
- Coordinated desk accessories
- Simple gallery walls
Explore Modern Preppy Room if you want to move away from a heavily traditional appearance.
The biggest difference is usually visual restraint.
DIY Cute Preppy Room Decor
A cute preppy room can use more playful details.
Consider:
- Pink
- Light blue
- Lavender
- Soft green
- White
- Cheerful patterns
DIY options include:
- Personalized artwork
- Colorful frames
- Cute storage labels
- Decorative cushions
- Small photo displays
- Patterned bulletin boards
See Cute Preppy Room and Cute Preppy Room Ideas for additional inspiration.
You can also explore Cute Preppy Room for another direction when building a playful space.
DIY Aesthetic Preppy Room Decor
An aesthetic preppy room is less about a single decoration and more about the way the entire room is composed.
Think about:
- Color consistency
- Lighting
- Texture
- Negative space
- Pattern repetition
- Furniture proportions
- Personal details
You can use DIY artwork, customized storage, photo displays, and decorative trays to create a more intentional visual identity.
For more ideas, explore Aesthetic Preppy Room Decor.
DIY Pink Preppy Room Ideas
Pink can work with preppy design in several ways.
Soft Pink
Pair with:
- Cream
- White
- Light blue
- Natural wood
Stronger Pink
Balance with:
- Navy
- White
- Neutral tones
Blush Pink
Combine with:
- Sage
- Cream
- Brass-toned accents
For a more specific visual direction, Aesthetic Pink Preppy Room can provide inspiration.
DIY Green and Navy Preppy Room Decor
Green and navy create a deeper, more traditional color relationship.
Use navy as the darker foundation and green as a secondary shade.
DIY options include:
- Green botanical art
- Navy frames
- Green cushions
- Navy storage
- Natural wood accents
For additional ideas, see Green and Navy Preppy Room Ideas.
The combination works particularly well when cream or white is used to create breathing room.
DIY Light Blue and White Preppy Decor
Light blue and white can create a bright and relaxed bedroom.
Use:
- White walls
- Light blue bedding
- Blue artwork
- White frames
- Soft blue cushions
- Natural textures
You can find more inspiration through Light Blue and White.
This palette is especially useful if you want a room that feels fresh without relying on strong contrast.
DIY Neutral and Classic Preppy Decor
Not every preppy room needs strong colors.
A neutral room can use:
- Cream
- Beige
- White
- Taupe
- Natural wood
- Muted navy
DIY projects can focus on texture rather than color.
Try:
- Woven storage
- Fabric-covered boxes
- Neutral artwork
- Wooden trays
- Textured cushions
- Simple frames
For more inspiration, explore Neutral and Classic Tones.
DIY Multicolor Preppy Room Decor
A multicolor room can be cheerful without becoming chaotic.
The secret is to establish one repeated base color.
For example:
White + Navy + Pink + Green + Yellow
White can act as the visual background while the other colors appear in smaller amounts.
DIY artwork is especially useful here because you can deliberately include several colors that already exist in the room.
Explore Multicolor Preppy Palettes for more color direction.
How Can You Make DIY Decor Look Expensive?
You don’t need expensive materials to create a polished appearance.
The biggest difference often comes from execution.
Focus on:
Clean edges
Paint should look intentional.
Consistent colors
Repeat selected colors.
Good proportions
Don’t put a tiny artwork on a huge empty wall without additional context.
Visual restraint
Avoid decorating every surface.
Quality finishing
Take time to smooth, clean, measure, and arrange.
A simple DIY project can look sophisticated when the finish is neat.
A complicated project can look unfinished if the execution is rushed.
How Do You Make a Preppy Room Look Good on a Small Budget?
Start with the largest visual problem rather than the smallest decorative detail.
If the room looks cluttered, buy storage before decorative accessories.
If the walls look empty, create artwork.
If the bed looks plain, work with bedding and cushions.
If the colors feel disconnected, coordinate existing pieces before buying new ones.
A Low-Cost Refresh Could Include:
- Reorganizing furniture
- Decluttering surfaces
- Repainting frames
- Creating wall art
- Refreshing cushions
- Styling books
- Improving storage
- Adding one decorative tray
- Rearranging existing accessories
This approach prevents unnecessary spending.
DIY Preppy Room Decor for a Small Bedroom
Small rooms require more attention to proportion.
Avoid using too many large decorative objects.
Instead:
- Use vertical wall space.
- Keep pathways clear.
- Choose multifunctional storage.
- Use lighter background colors.
- Keep patterns controlled.
- Use mirrors thoughtfully.
- Keep surfaces organized.
A small bedroom can still have personality.
The trick is making every decorative piece earn its place.
DIY Preppy Room Decor for a Desk or Study Area
A desk is an excellent place for DIY projects because organization and decoration can work together.
Create:
- A coordinated pen holder
- A decorated bulletin board
- A DIY desk tray
- A simple framed print
- A customized storage box
- A color-coordinated notebook display
Keep the work area functional.
If you can’t comfortably study because decorative items occupy the usable surface, the styling has gone too far.
DIY Preppy Room With LED Lighting
LED lighting can work with preppy decor when used as a subtle supporting element rather than the entire focus of the room.
Choose lighting that complements your palette.
For example:
- Soft white with navy and cream
- Warm lighting with blush and beige
- Gentle cool lighting with blue and white
Avoid allowing decorative lighting to overpower the room’s classic elements.
If you’re specifically interested in this combination, explore Preppy Room With LED Lights.
The goal is to make lighting support the room’s atmosphere.
How Do You Decorate a Preppy Room Without Making It Look Cluttered?
This is one of the most important questions when working with DIY decor.
Because DIY projects are personal, there is a temptation to display everything you create.
Don’t.
Choose your strongest pieces.
A useful method is:
One Main Focal Point
For example:
- Bed
- Gallery wall
- Headboard
- Feature wall
Two or Three Supporting Areas
For example:
- Nightstand
- Desk
- Dresser
Small Accents
Use a few small accessories to connect everything.
This gives the eye somewhere to rest.
Common DIY Preppy Room Decor Mistakes
Mistake 1: Using Too Many Colors
You may like navy, pink, green, yellow, red, blue, and lavender individually.
That doesn’t mean they all need equal space in the same room.
Better Approach
Choose a main palette and let additional colors appear selectively.
Mistake 2: Using Too Many Patterns
Stripes, gingham, floral, plaid, checks, and geometric designs can all be attractive.
But placing all of them together without a plan can create visual noise.
Better Approach
Choose a dominant pattern and support it with one or two smaller patterns.
Mistake 3: Making Every DIY Project Look Different
A room can feel disconnected when every project has a different color, material, and design language.
Better Approach
Repeat:
- Colors
- Frame finishes
- Materials
- Patterns
- Shapes
Mistake 4: Ignoring Function
A decorative room still needs to work for everyday life.
You need space to:
- Sleep
- Study
- Dress
- Store belongings
- Move around
Decor should support those activities rather than obstruct them.
Mistake 5: Buying Materials Before Planning
This is one of the easiest ways to waste money.
Before starting a project, determine:
- Size
- Color
- Location
- Materials
- Expected finish
- Whether it solves a real problem
Mistake 6: Overdecorating
If every shelf, wall, table, and corner has something on it, the room may feel visually heavy.
Leave open space.
A polished room needs breathing room.
Mistake 7: Copying an Inspiration Image Exactly
An inspiration photo can show you an idea, but your room may have different:
- Dimensions
- Lighting
- Furniture
- Window placement
- Wall color
- Storage needs
Use inspiration as a starting point, not a strict template.
How Do You Plan a Complete DIY Preppy Room Makeover?
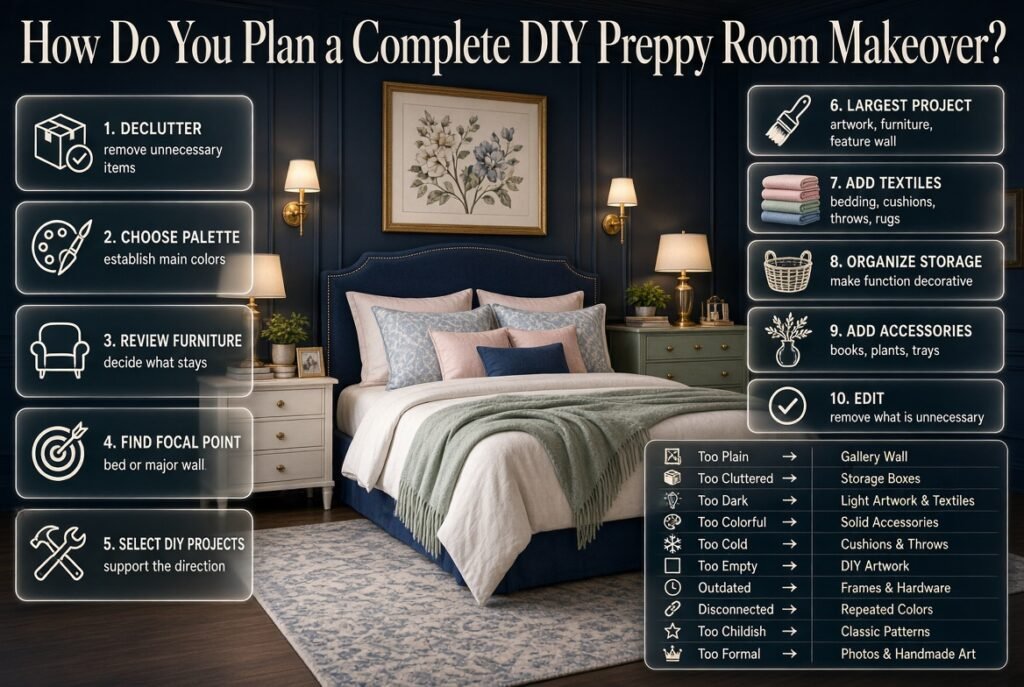
If you’re planning more than one DIY project, work in stages.
Stage 1: Declutter
Remove items that don’t belong.
Stage 2: Establish the Palette
Choose your main colors.
Stage 3: Review Existing Furniture
Decide what stays.
Stage 4: Identify the Focal Point
Usually the bed or a major wall.
Stage 5: Select DIY Projects
Choose projects that support the overall direction.
Stage 6: Complete the Largest Project
Start with artwork, furniture refresh, or a feature wall.
Stage 7: Add Textiles
Introduce bedding, cushions, throws, and rugs.
Stage 8: Organize Storage
Make functional items part of the decor.
Stage 9: Add Small Accessories
Use trays, books, plants, and small decorative objects.
Stage 10: Edit
Remove anything unnecessary.
That final edit can make a surprisingly large difference.
DIY Preppy Room Decor Decision Table
| If Your Room Feels… | Focus On… | DIY Idea |
|---|---|---|
| Too plain | Personality | Gallery wall |
| Too cluttered | Organization | Storage boxes |
| Too dark | Light colors | Light artwork and textiles |
| Too colorful | Balance | Solid-color accessories |
| Too cold | Texture | Cushions and throws |
| Too empty | Wall interest | DIY artwork |
| Outdated | Small refreshes | Frames and hardware |
| Disconnected | Coordination | Repeated colors |
| Too childish | Simplicity | Classic patterns |
| Too formal | Personality | Photos and handmade art |
This approach is more useful than simply asking what decoration you should buy.
First identify the problem.
Then choose the project that solves it.
DIY Preppy Room Decor by Budget
Very Small Budget
Focus on:
- Rearranging
- Decluttering
- Existing frames
- DIY artwork
- Book styling
- Existing fabric
- Existing cushions
Small Budget
Add:
- Paint
- New frame materials
- Storage boxes
- Fabric
- Decorative trays
- Small accessories
Medium Budget
Consider:
- New bedding
- Curtains
- Rug
- Larger artwork
- Better lighting
- Accent furniture
Larger Refresh
Consider:
- Furniture
- Wall treatments
- Larger rugs
- Complete bedding changes
- Multiple coordinated textiles
The important principle is to spend gradually.
Don’t buy everything before you know how the room will look.
How Can You Personalize DIY Preppy Decor?
A preppy room should still feel like your room.
Personal details can include:
- Favorite books
- Photographs
- Meaningful artwork
- Collections
- Initial-inspired details
- Handmade pieces
- Travel memories
- Favorite colors
The best personal details don’t need to be expensive.
A framed photograph can be more meaningful than an expensive generic decoration.
How Do You Combine Classic and Modern Preppy Decor?
You don’t have to choose between traditional and contemporary elements.
Try combining:
Classic: navy, stripes, traditional frame
with
Modern: simple furniture, minimal artwork, clean storage
For example:
A traditional navy-striped cushion can sit on a clean modern chair.
A classic botanical print can hang above a simple desk.
A traditional brass-toned lamp can sit beside modern storage.
This creates a room that feels current without losing the character associated with preppy style.
How Do You Use Texture in DIY Preppy Decor?
Color gets attention, but texture creates depth.
Try combining:
- Cotton
- Linen
- Velvet
- Woven materials
- Wood
- Upholstery
- Knitted textiles
For example:
Cotton bedding + woven basket + wooden tray + soft throw
The colors can remain simple while the different textures make the room feel richer.
This is especially useful when you’re decorating with neutral or pastel colors.
How Do You Style a DIY Preppy Bed?
The bed is often the visual center of a bedroom.
Start with comfortable bedding.
Then layer:
- Main bedding
- Quilt or coverlet
- Decorative pillows
- Accent cushion
- Throw
Don’t use every available pillow simply because you have them.
Instead, create a clear arrangement.
A striped comforter can be supported by solid pillows, a floral accent, and a simple throw.
The bed should look comfortable enough to use, not like a display that cannot be touched.
How Do You Style Nightstands?
Nightstands are small, so clutter becomes noticeable quickly.
A simple arrangement could include:
- Lamp
- Book
- Small tray
- One decorative object
You can DIY the tray or frame to connect it with the rest of the room.
If you use two nightstands, they can be symmetrical without being completely identical.
For example, both sides might use the same lamp style while the smaller decorative items differ.
How Do You Use Wall Art Without Overdoing It?
Wall art should relate to the room’s scale.
A tiny piece can disappear on a large wall.
A huge gallery wall can overwhelm a small bedroom.
Think about:
- Wall size
- Furniture below it
- Bed width
- Frame size
- Number of pieces
- Color relationship
A gallery wall above a bed should feel connected to the bed rather than floating separately.
DIY Preppy Room Decor for Different Color Personalities
Navy Lover
Use navy as the anchor and support it with white, cream, and small warm accents.
Pink Lover
Use pink as an accent or dominant color with white, cream, or navy.
Green Lover
Combine sage or deeper green with cream, natural wood, or navy.
Blue Lover
Layer light blue, medium blue, and white for depth.
Neutral Lover
Use cream, beige, white, wood, and subtle navy accents.
Color Lover
Choose one neutral foundation and distribute brighter colors carefully.
How Can You Make DIY Decor Feel Cohesive?
Repetition is the easiest technique.
If you use navy in the bedding, repeat navy in:
- Artwork
- Cushion
- Storage
- Frame
- Small accessory
You don’t need navy everywhere.
Just enough repetition creates a connection.
The same principle applies to materials.
If you use natural wood on a tray, repeat it through a small frame or furniture detail.
If you use brass-toned accents, repeat them subtly.
When Should You Stop Adding Decor?
Stop when the room feels complete rather than when every available space is filled.
Ask:
- Is the room easy to clean?
- Can I move comfortably?
- Can I find things easily?
- Is the main focal point clear?
- Are the colors balanced?
- Do the patterns compete?
- Does the room still feel personal?
If the answer is yes, you probably don’t need another decoration.
How Can You Use Preppy Room Inspiration Without Copying It?
Look at inspiration images for principles rather than exact products.
Instead of saying:
“I need that exact room.”
Ask:
“What is making this room work?”
Maybe the answer is:
- Repeated navy accents
- Symmetrical bedside tables
- Layered bedding
- Large artwork
- Controlled patterns
- Natural wood
- Warm lighting
Then apply those principles to your own room.
This creates a more personal result.
How Does DIY Preppy Decor Work With an Aesthetic Room?
An aesthetic room usually depends on visual consistency.
DIY can actually help because you control the details.
For example, you can create three pieces using the same palette:
Wall art: navy + cream
Storage box: cream + navy trim
Tray: natural wood + navy detail
Those three objects can look connected even though they are completely different items.
For broader aesthetic inspiration, see Preppy Room Aesthetic.
How Can You Create a Preppy Room Without Replacing Furniture?
This is one of the most budget-friendly approaches.
Keep your:
- Bed
- Desk
- Dresser
- Nightstand
- Chair
Then update:
- Bedding
- Artwork
- Frames
- Cushions
- Storage
- Lighting
- Accessories
You can also change hardware on compatible furniture.
This allows the room’s visual identity to change without a major furniture purchase.
What DIY Projects Are Best for Beginners?
Start with projects that don’t require complicated equipment.
Good options include:
- Painting frames
- Creating artwork
- Decorating storage boxes
- Styling trays
- Making simple cushion covers
- Creating bulletin boards
- Organizing shelves
- Creating photo displays
Once you become comfortable with those, you can consider more involved projects.
If a project requires specialized tools, structural installation, or electrical work, get appropriate adult or professional help rather than improvising.
12-Step DIY Preppy Room Weekend Plan
If you want a practical schedule, use this simple plan.
Step 1: Photograph the Room
Take a few photos from different angles.
This helps you notice problems you don’t see while standing inside the room.
Step 2: Declutter
Remove unnecessary objects.
Step 3: Choose Colors
Pick your main palette.
Step 4: Choose the Focal Point
Decide whether the bed, wall, or another area should lead the design.
Step 5: Gather Existing Materials
Look for frames, fabric, boxes, books, trays, and accessories.
Step 6: Plan DIY Projects
Choose three to five projects.
Step 7: Complete the Main Project
Start with the most visually important change.
Step 8: Add Bedding
Layer textiles carefully.
Step 9: Organize Storage
Make practical objects attractive.
Step 10: Add Wall Decor
Hang artwork only after the room’s main arrangement is established.
Step 11: Add Small Accessories
Use a few finishing details.
Step 12: Edit
Remove anything that feels unnecessary.
This process keeps the makeover controlled.
How Can I Make My Room Look Preppy With DIY Decor?
The easiest way to create a preppy room with DIY decor is to start with a coordinated color palette and then introduce classic patterns, personalized artwork, and practical decorative details. You don’t need to make every item yourself. Instead, refresh existing pieces and create a few custom accents that connect the room visually.
Start with the largest elements, such as bedding, curtains, rugs, and furniture, then use DIY projects to add personality. For example, repainting old picture frames in navy or cream, creating simple striped artwork, customizing storage boxes, or making patterned cushion covers can make an ordinary bedroom feel much more intentional.
Useful ways to begin include:
Choose 2–4 main colors before starting your projects.
Use classic patterns such as stripes, gingham, plaid, or small florals.
Refresh existing frames, trays, baskets, or storage instead of replacing them.
Create one noticeable DIY focal point, such as a gallery wall.
Repeat the same colors in different areas of the room.
Keep practical storage attractive and organized.
Leave some empty space so the room doesn’t become visually crowded.
The most important thing is coordination rather than quantity. A few well-finished DIY pieces can have more impact than filling the room with handmade decorations.
What Colors Work Best for a DIY Preppy Room?
The best color palette depends on the atmosphere you want, but classic preppy combinations commonly include navy and white, blue and cream, green and cream, pink and white, and red and navy. You can also create a softer or more contemporary room using pastels and neutral tones.
Rather than choosing several colors at random, select one dominant color, one supporting color, and one or two smaller accent shades. This makes it much easier to coordinate DIY artwork, cushions, storage, frames, and other decorative projects.
Useful color combinations to consider:
Navy + White: Classic and crisp
Blue + Cream: Soft and relaxed
Green + Cream: Fresh and natural
Pink + White: Soft and cheerful
Red + Navy: Bold and traditional
Light Blue + White: Bright and airy
Green + Navy: Rich and sophisticated
Neutral + Navy: Calm and classic
Multicolor + White: Playful and energetic
When choosing your palette:
Look at the colors already present in your furniture and flooring.
Repeat important colors in at least two or three areas.
Use white, cream, or another neutral to create visual breathing room.
Keep strong colors mainly in smaller accents if the room already feels busy.
Test paint or fabric colors before committing to a larger DIY project.
⭐ Expert Tip: Don’t try to make every DIY piece match exactly. Coordinated colors create a more natural and professional-looking room than identical decorations.
How Do You Mix Patterns in a Preppy Room Without Making It Look Cluttered?
Successful pattern mixing is mainly about controlling scale, color, and placement. You can combine stripes, gingham, plaid, florals, and checks, but they shouldn’t all compete for attention. Start with one dominant pattern, add a smaller supporting pattern, and use solid colors between them.
For example, striped bedding can become the main pattern while a floral cushion provides a medium-scale design and a small gingham pillow adds another layer. Cream, white, or navy solid pieces can then calm the overall arrangement.
A simple pattern hierarchy is:
Large: Stripes or large-scale floral
Medium: Plaid or medium floral
Small: Gingham, checks, or fine geometric details
Solid: White, cream, navy, or another supporting color
Avoid these common pattern mistakes:
Using several large patterns together.
Choosing patterns with completely unrelated colors.
Putting patterns on every visible surface.
Making the bedding, curtains, rug, pillows, and artwork equally bold.
Adding another pattern whenever the room feels empty.
📌 Quick Tip: If you already have a strong patterned bed, let your DIY artwork or storage pieces stay relatively simple. Pattern mixing works best when the eye has somewhere calm to rest.
What DIY Projects Make a Preppy Room Look More Polished?
The most effective DIY projects are usually the ones that combine decoration with a practical purpose. Instead of creating random crafts, focus on pieces that improve an area of the room while reinforcing its color palette and style.
Picture frames, gallery walls, decorative trays, customized storage boxes, bulletin boards, cushion covers, desk organizers, and simple wall art are particularly useful because they can be personalized without changing the entire room.
Professional-friendly DIY projects include:
Painting old frames in a coordinated color.
Creating a gallery wall with different artwork but similar frames.
Making simple striped, geometric, or botanical wall art.
Covering a bulletin board with fabric that matches the room.
Refreshing plain storage boxes with coordinated materials.
Creating a decorative tray for a nightstand or dresser.
Customizing desk organizers for a study area.
Making or refreshing cushion covers using preppy patterns.
Creating personalized photo displays.
Updating suitable furniture hardware for a subtle refresh.
To achieve a cleaner finish:
Measure before cutting materials.
Prepare surfaces before painting.
Use consistent colors.
Keep edges neat.
Allow paint and adhesives to dry properly.
Check the finished piece in the actual room before making more.
💡 Pro Tip: Don’t judge a DIY project only while you’re making it. Put it in the room and view it from the doorway. You’ll immediately see whether its size, color, and placement actually work with the rest of the space.
How Can I Decorate a Preppy Room Without Making It Look Too Cluttered?
The easiest way to prevent clutter is to create a clear visual hierarchy instead of decorating every empty space. Choose one main focal point, such as the bed, a gallery wall, or a feature wall, and allow the remaining areas to support it with simpler details.
DIY decorating can easily become excessive because handmade pieces often have personal value. That doesn’t mean every project needs to stay on display. Rotate accessories, keep useful items organized, and leave some surfaces intentionally open.
Use this simple structure:
Main focal point: Bed, gallery wall, or feature wall
Supporting areas: Desk, dresser, or nightstand
Small accents: Tray, book, plant, cushion, or framed photo
Storage: Baskets, boxes, and organizers that keep everyday items contained
To keep the room balanced:
Leave some wall and surface space empty.
Limit the number of competing patterns.
Repeat colors instead of adding new ones constantly.
Use attractive storage for everyday items.
Group small accessories together rather than scattering them everywhere.
Remove decorations that don’t contribute to the overall design.
Make sure the room remains comfortable and functional.
⚠ Common Mistake: When a room feels unfinished, many people automatically add more decorations. Sometimes the better solution is to rearrange existing pieces, improve the focal point, or remove visual clutter rather than buying or making something new.
A successful DIY preppy room should feel coordinated, personal, and comfortable, not like every available surface has been turned into a display.
Conclusion
Creating a beautiful preppy room does not have to mean buying expensive furniture or completely changing your space. The most successful DIY preppy room decor ideas are often the ones that add personality through thoughtful colors, classic patterns, useful organization, and small details that feel personal.
Start with a clear color palette, choose a few patterns that work well together, and focus on decorating the areas that make the biggest visual difference. A gallery wall, customized storage, decorative pillows, a styled desk, framed artwork, or a simple lighting update can make your room feel noticeably more finished without requiring a major makeover.
The key is balance. Preppy style works best when traditional details, fresh colors, patterns, and personal touches have enough space to stand out. Instead of adding decoration simply to fill an empty corner, choose pieces that serve a purpose or contribute something meaningful to the overall room.
Whether you prefer a classic navy-and-white look, soft pink and white, green and cream, a modern interpretation, or a more colorful combination, you can adapt the style to your own personality and budget. The goal is not to copy a picture-perfect room—it is to create a space that feels comfortable, organized, coordinated, and genuinely yours.
Take your time, begin with one small project, and build from there. With a little creativity and thoughtful planning, even simple DIY changes can turn an ordinary bedroom into a polished and inviting preppy space.