Introduction
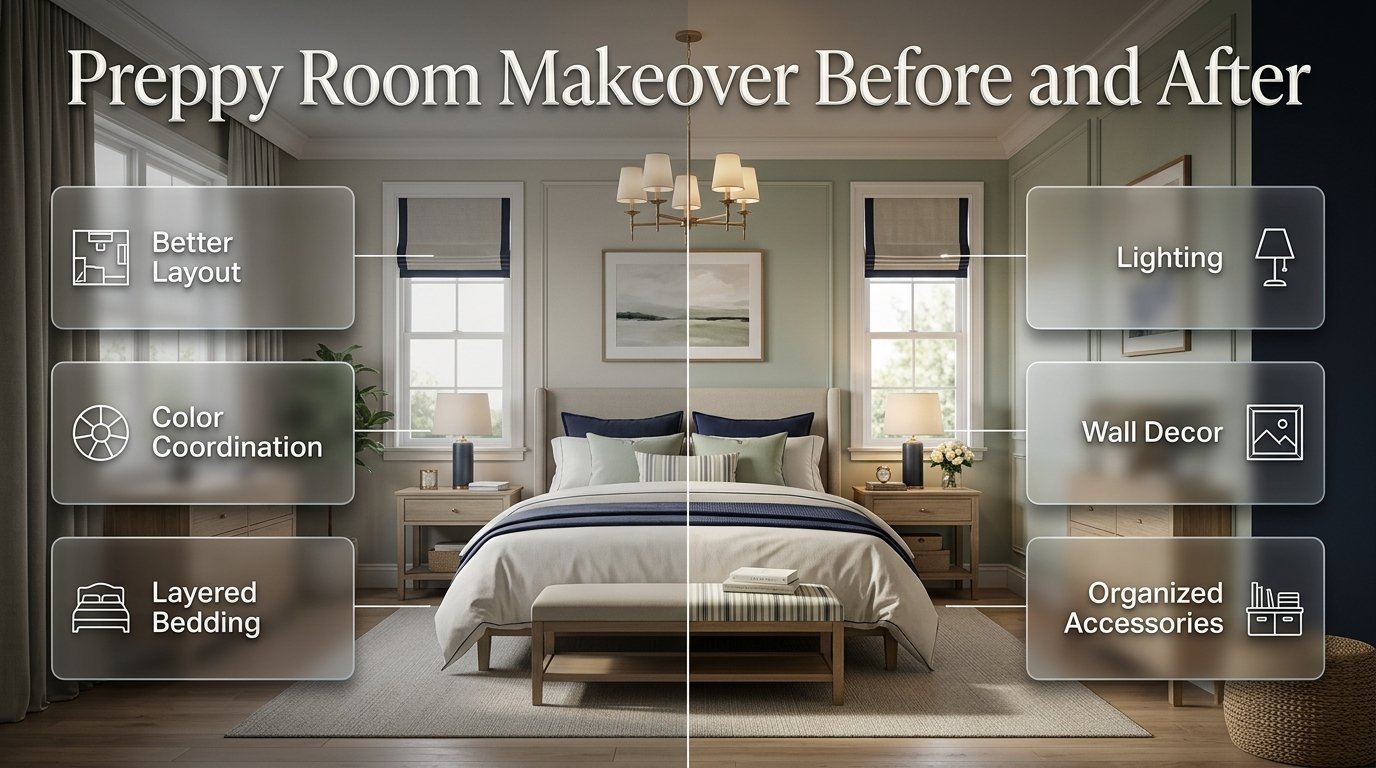
Preppy Room Makeover Before and After | A room can have perfectly good furniture and still feel unfinished. The walls may be empty, the bedding may look flat, the colors may feel disconnected, or the furniture may not make the best use of the available space. When that happens, buying more decoration isn’t always the answer. What the room often needs is a clear design plan.
A preppy room makeover before and after gives you a practical way to see exactly what can change. Instead of replacing everything, you can improve the layout, color palette, bedding, lighting, wall decor, storage, patterns, and accessories in a controlled sequence.
If you’re looking for a broader source of inspiration before deciding what direction to take, visit the Preppy Room homepage. It provides a useful starting point for exploring classic colors, patterns, decorating ideas, bedrooms, furniture, and different interpretations of the preppy style.
The biggest lesson is simple: a successful makeover isn’t about making the room look completely different at any cost. It’s about making the room work better, feel more coordinated, and reflect the personality of the person using it.
In this guide, you’ll learn how to evaluate the room before starting, plan a realistic transformation, choose colors, improve furniture placement, style the bed, mix patterns, update walls, introduce lighting, organize accessories, work with different budgets, and judge whether the final result actually feels complete.
What Does a Preppy Room Makeover Before and After Really Mean?
A preppy room makeover before and after is a visual comparison showing how a room changes when its layout, colors, furniture, textiles, lighting, wall decor, and accessories are redesigned with a consistent preppy direction.
The important word is consistent.
A preppy room doesn’t become successful simply because it contains navy, stripes, plaid, or decorative pillows. Those elements need to relate to one another.
For example, imagine a bedroom before the makeover:
- The walls are mostly empty.
- The bedding is plain.
- The furniture isn’t arranged efficiently.
- Several unrelated colors appear around the room.
- The desk feels disconnected from the rest of the space.
- Small accessories are scattered everywhere.
- The lighting is harsh.
- Storage is visible and distracting.
Now imagine the same room after the makeover:
- The furniture has a clearer arrangement.
- Cream becomes the foundation color.
- Navy and soft green provide supporting colors.
- Bedding has several controlled layers.
- A few classic patterns introduce character.
- Artwork fills an important wall without overwhelming it.
- Lighting is layered.
- Storage is organized.
- Accessories repeat the room’s colors and materials.
The furniture may not have changed dramatically.
The relationships between the elements have changed.
That’s what makes a before-and-after transformation useful.
Why Is the Before-and-After Approach So Effective?
Before-and-after planning forces you to identify what actually needs improvement.
Without this step, decorating can easily become a shopping exercise. You see a beautiful lamp, then a pillow, then artwork, then a rug, and suddenly you have many attractive objects but no clear design.
A before-and-after mindset asks different questions:
- What looks wrong right now?
- What feels unfinished?
- What should remain?
- What can be reused?
- What needs to be replaced?
- Where is the room visually unbalanced?
- Which colors should dominate?
- What should the room feel like when it’s finished?
This approach can also save money.
Instead of replacing a perfectly good nightstand because it doesn’t look exciting, you might improve its position, change the surrounding colors, update the hardware, and style it differently.
The result can be more effective than buying a completely new piece.
Pro Tip: Take photographs before touching anything. Photograph the room from several corners and from approximately the same height. Looking at the room through a photograph often reveals clutter, awkward furniture placement, and visual imbalance that you don’t notice when standing inside the room.
How Do You Evaluate the Room Before a Preppy Makeover?
Before choosing colors or buying decor, perform a room audit.
Walk into the room as if you’ve never seen it before.
Look at the largest visual elements first:
- Walls
- Bed or main furniture
- Floor
- Windows
- Lighting
- Storage
- Decorative surfaces
- Smaller accessories
Don’t start with the smallest objects.
If the bed is positioned badly, changing a cushion won’t solve the problem.
If the room has too many competing colors, buying another decorative object won’t create harmony.
Make Three Lists
Create three simple categories:
Keep
Things that already work.
Improve
Things that have potential but need adjustment.
Replace
Things that genuinely don’t work for the room.
For example:
| Category | Example |
|---|---|
| Keep | Wooden nightstand |
| Keep | Existing dresser |
| Improve | Plain bedding |
| Improve | Empty wall |
| Improve | Lighting |
| Replace | Oversized chair blocking movement |
| Replace | Damaged storage unit |
This prevents unnecessary spending.
What Should the Before-and-After Room Feel Like?
Before choosing specific products or decorations, define the atmosphere.
A preppy room can have many personalities.
It can feel:
- Classic
- Fresh
- Cozy
- Elegant
- Playful
- Minimal
- Colorful
- Modern
- Traditional
- Relaxed
The mistake is trying to achieve all of these at once.
Instead, choose two or three qualities.
For example:
Classic + cozy + polished
or:
Modern + colorful + organized
or:
Minimal + fresh + sophisticated
This decision becomes a filter for everything that follows.
If an item doesn’t support the desired atmosphere, you don’t need it simply because it’s attractive.
How Do You Create a Preppy Color Transformation?
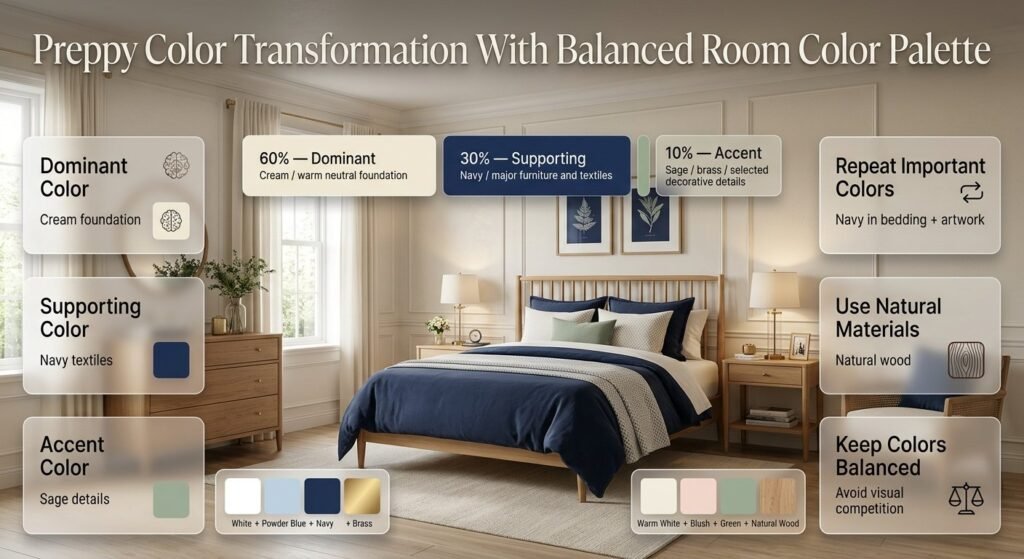
Color is one of the most powerful parts of a before-and-after makeover because it can change the atmosphere of a room without changing its architecture.
A successful preppy palette usually has a clear hierarchy.
Instead of giving every color equal attention, establish:
- A dominant color
- One or two supporting colors
- A smaller accent color
- Neutral or natural materials
For example:
Cream + navy + sage + natural wood
or:
White + powder blue + navy + brass
or:
Warm white + blush + green + natural wood
The exact combination depends on your room.
Use the 60-30-10 Principle as a Starting Point
The 60-30-10 approach can help organize color visually.
Approximately:
- 60% dominant color
- 30% supporting color
- 10% accent
This isn’t a strict mathematical requirement.
It’s simply a useful way to prevent every color from competing.
A bedroom might use cream walls and major textiles as the dominant foundation, navy bedding and furniture details as the supporting color, and brass or sage as the smaller accent.
The result feels more intentional because the eye knows which colors should dominate.
Expert Tip: Repeat important colors in different areas. If navy appears in the bedding, repeat it subtly in artwork or a cushion. Repetition creates visual connection without requiring everything to match.
Before and After: Fixing a Disconnected Color Scheme
Imagine the original room contains:
- Pink bedding
- Bright blue curtains
- Green accessories
- Black furniture
- Orange artwork
- Purple cushions
None of those colors are automatically bad.
The problem is that they may not have a clear relationship.
Instead of throwing everything away, identify which colors can form the foundation.
For example:
After:
- Warm white
- Soft blue
- Navy
- Small brass accents
Some accessories may be removed, while others can be relocated or replaced.
The room becomes calmer without becoming boring.
How Can Bedding Create a Dramatic Before-and-After Effect?
In a bedroom, the bed is usually one of the largest visual elements.
That makes bedding one of the easiest ways to create a noticeable transformation.
A completely flat bed can make an otherwise attractive room feel unfinished.
A layered bed can create depth and visual structure.
A practical preppy arrangement might include:
- Fitted sheet
- Top sheet
- Quilt or coverlet
- Duvet or comforter
- Sleeping pillows
- Decorative pillows
- Accent cushion
- Folded throw
You don’t need every possible layer.
The goal is to create controlled depth.
How Many Patterns Should You Use?
There is no universal number, but beginners usually have better results when patterns have different scales.
For example:
Large pattern: Stripe
Medium pattern: Small plaid
Small pattern: Gingham
Solid: Cream or navy
This gives each pattern a different role.
If every pattern is equally bold, the bed can become visually noisy.
How Do You Mix Preppy Patterns Without Making the Room Busy?
Patterns are one of the most recognizable parts of preppy interiors.
Common choices include:
- Stripes
- Plaid
- Gingham
- Checks
- Florals
- Botanical prints
- Geometric patterns
The trick isn’t avoiding patterns.
It’s controlling them.
Match Colors, Not Everything Else
Different patterns can coexist when they share some colors.
For example:
- Navy stripe
- Navy-and-cream gingham
- Small green floral
- Solid cream
The patterns are different, but the palette connects them.
Vary Pattern Scale
Avoid putting three large patterns next to each other.
Instead:
Large + medium + small + solid
This gives the eye places to rest.
Common Mistake: Choosing several patterns simply because each one looks beautiful individually. Always look at the combination as a whole before committing to all of them.
How Should You Rearrange Furniture Before Buying Anything?
Furniture layout should be addressed before decoration.
Start with the largest piece.
In a bedroom, that’s usually the bed.
Then consider:
- Walking paths
- Door clearance
- Window access
- Natural light
- Closet access
- Desk placement
- Storage
- Electrical outlets
The room should be comfortable to use.
A beautiful layout that makes it difficult to walk around isn’t a successful makeover.
Try a Furniture Test
Before moving heavy furniture repeatedly, sketch the room.
Mark:
- Door
- Windows
- Bed
- Dresser
- Desk
- Chair
- Storage
Then test different arrangements.
You can also temporarily move smaller pieces to see how the room feels.
Sometimes the best makeover is surprisingly simple.
Moving a desk closer to useful daylight, centering the bed, or removing one oversized chair can make the room feel completely different.
Before and After: Creating a Strong Focal Point
Every room benefits from having an obvious visual anchor.
In a bedroom, this is often the bed.
If the bed is the focal point, everything around it should support rather than compete with it.
You might use:
- A structured headboard
- Layered bedding
- Balanced nightstands
- Matching or coordinated lamps
- Artwork above the bed
- A restrained accent wall
The goal isn’t to make the bed enormous.
It’s to make its position feel intentional.
How Can Wall Decor Transform a Preppy Room?

Blank walls can make a room feel incomplete.
But filling every wall isn’t the answer either.
Choose wall treatments according to the room’s size and existing furniture.
Options include:
- Gallery walls
- Framed artwork
- Mirrors
- Decorative shelves
- Botanical prints
- Traditional illustrations
- Accent wall details
- Simple paneling
A gallery wall can be particularly effective because it creates structure without requiring a single enormous artwork.
Think About Scale
A tiny frame on a large wall can disappear visually.
Likewise, oversized artwork can overwhelm a small room.
Look at the furniture underneath or beside the wall.
Artwork should feel appropriately related to it.
Quick Tip: Stand several feet away from the wall before deciding whether artwork is correctly sized. Something that looks large up close can look surprisingly small once viewed from across the room.
How Does Lighting Change a Before-and-After Transformation?
Lighting is often the difference between a room that looks attractive in daylight and one that remains comfortable throughout the evening.
Don’t rely entirely on one ceiling fixture.
A layered lighting plan can include:
General Lighting
Provides overall illumination.
Task Lighting
Useful for reading, studying, or working.
Accent Lighting
Adds atmosphere and highlights decorative areas.
For example:
Ceiling light + bedside lamps + desk lamp
creates more flexibility than one overhead fixture.
Lighting also affects how colors appear.
Warm light can make cream, wood, and traditional colors feel softer and more inviting.
How Do You Make a Preppy Room Look More Expensive?
A polished room doesn’t necessarily require expensive furniture.
The appearance of quality often comes from:
- Consistent colors
- Good proportions
- Layered textiles
- Coordinated hardware
- Appropriate lighting
- Controlled patterns
- Organized surfaces
- Properly sized artwork
- Natural materials
One common mistake is trying to make a room look expensive by adding more decorative objects.
That can have the opposite effect.
Instead, focus on editing.
Remove objects that don’t contribute.
Give important pieces more visual space.
Use Repetition
If you use brass:
- Brass lamp
- Brass frame
- Brass hardware
If you use natural wood:
- Wooden nightstand
- Wooden frame
- Small wood accessory
The repetition makes the finishes feel intentional.
How Can You Use Existing Furniture in a Makeover?
You don’t need to replace every piece.
Before removing furniture, ask:
Is it functional?
Is it the correct size?
Is it in good condition?
Can it work with the new palette?
Can its appearance be improved?
A simple wooden dresser may become much more attractive when surrounded by coordinated artwork, lighting, and textiles.
An old chair may work perfectly in a reading corner after being repositioned and paired with a new cushion.
A basic desk can look intentional when combined with a suitable lamp, organized storage, and framed artwork.
This is particularly valuable for budget-conscious makeovers.
How Do You Organize a Preppy Room Without Losing Its Style?
Storage should support the design rather than fight against it.
Visible clutter can make even a beautifully decorated room feel unfinished.
Look for opportunities to organize:
- Books
- School supplies
- Cables
- Accessories
- Clothing
- Small electronics
- Personal items
Use attractive baskets, boxes, drawers, shelves, and closed storage where appropriate.
But don’t hide everything simply for appearance.
Frequently used items should remain accessible.
The goal is organized convenience, not an empty showroom.
How Do You Add Personality Without Making the Room Look Cluttered?
A preppy room should still feel like someone’s room.
Add details that have meaning:
- Favorite books
- Framed photographs
- Personal artwork
- Collections
- Travel memories
- Handmade pieces
- Small keepsakes
The secret is editing.
Instead of displaying every personal object, choose a few that have genuine meaning.
Group related objects together.
Leave some negative space around them.
This creates personality without visual chaos.
What Does a Modern Preppy Before-and-After Look Like?
A modern preppy makeover keeps the recognizable character of the style but simplifies the overall composition.
Before
- Too many decorative objects
- Several unrelated colors
- Heavy furniture
- Multiple competing patterns
- Random wall art
After
- Cleaner furniture
- Controlled palette
- One dominant pattern
- Fewer accessories
- Contemporary lighting
- More open space
The result can still feel unmistakably preppy while looking fresh.
The important distinction is that modern doesn’t mean removing all personality.
It means editing the room more carefully.
What Does a Classic Preppy Before-and-After Look Like?
A classic interpretation can lean more heavily into:
- Navy
- Cream
- White
- Traditional furniture
- Stripes
- Plaid
- Framed artwork
- Brass
- Natural wood
The room may feel more traditional, but it shouldn’t become visually heavy.
Use lighter textiles and balanced negative space to keep the result comfortable.
How Can You Create a Cozy Preppy Makeover?
A cozy version should prioritize comfort.
Focus on:
- Soft bedding
- Layered blankets
- Cushions
- Rugs
- Warm lighting
- Curtains
- Upholstered furniture
- Natural textures
The room should feel comfortable to spend time in.
Don’t confuse cozy with crowded.
A cozy room still needs clear pathways and organized surfaces.
How Can You Create a Minimal Preppy Makeover?
Minimal preppy design is about reducing visual noise while keeping recognizable style.
Use:
- One dominant pattern
- Two or three primary colors
- Simple furniture
- Limited artwork
- Functional accessories
- Clear surfaces
- Organized storage
This approach is particularly useful for small rooms.
Instead of adding more to create personality, choose a smaller number of stronger elements.
How Can You Make the Makeover Work on a Small Budget?
A budget doesn’t mean the transformation has to feel incomplete.
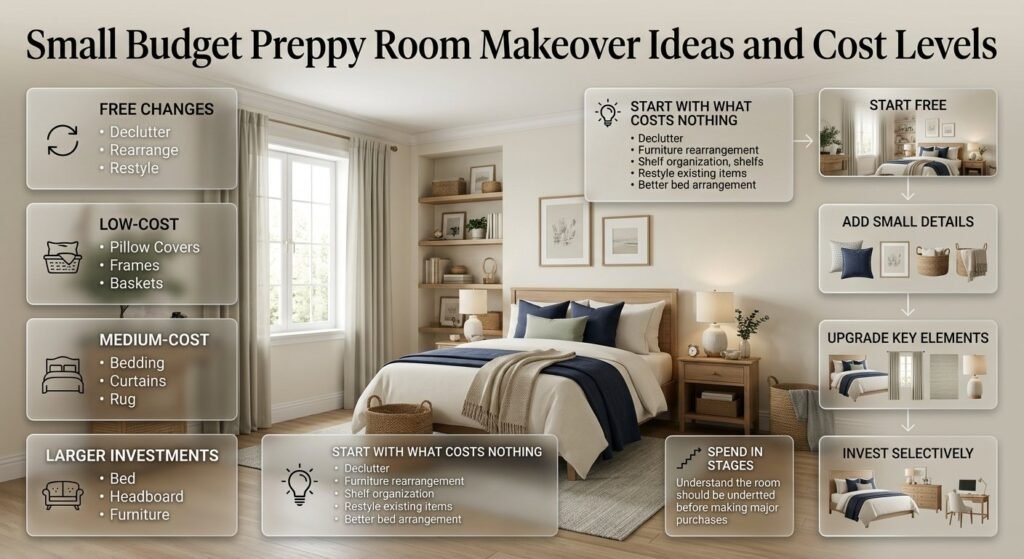
Start with changes that cost nothing.
Free Changes
- Declutter
- Rearrange furniture
- Reorganize shelves
- Remove unnecessary accessories
- Restyle existing items
- Improve the bed arrangement
Low-Cost Changes
- Pillow covers
- Small artwork
- Frames
- Storage baskets
- Hardware
- Throws
- Small decorative pieces
Medium-Cost Changes
- Bedding
- Curtains
- Rug
- Lighting
- Larger artwork
Larger Investments
- Bed
- Headboard
- Dresser
- Desk
- Flooring
- Wallpaper
- Major lighting
A staged approach lets you understand the room before spending heavily.
For readers specifically working within a tighter budget, the Budget Preppy Room Makeover guide provides another useful way to approach the project without treating every element as something that needs to be replaced.
How Do You Plan a DIY Preppy Room Makeover?
A DIY project works best when you don’t try to complete everything simultaneously.
Break it into phases.
Phase 1: Declutter
Remove anything broken, unused, duplicated, or clearly out of place.
Phase 2: Plan
Choose the color palette and decide what furniture stays.
Phase 3: Rearrange
Test the furniture layout.
Phase 4: Complete Major Changes
Paint, wall treatment, furniture updates, or other larger projects should happen before final decoration.
Phase 5: Add Textiles
Bring in bedding, curtains, rugs, throws, and cushions.
Phase 6: Add Lighting
Position task and ambient lighting.
Phase 7: Style
Add artwork and accessories.
Phase 8: Edit
Remove anything that now feels unnecessary.
This sequence prevents you from decorating an area that will later be moved or redesigned.
For a more hands-on transformation, the DIY Preppy Room Makeover guide can help you structure the project from planning through finishing details.
What Is the Difference Between a Room Refresh and a Full Makeover?
Not every room needs a complete transformation.
A refresh changes selected elements.
For example:
- New bedding
- New cushions
- New artwork
- Better lighting
- Rearranged furniture
A full makeover may involve:
- New wall color
- Major furniture changes
- New flooring
- New lighting
- New textiles
- Storage redesign
- Extensive wall decoration
Before starting, decide which category your room actually needs.
A refresh is usually faster, less expensive, and less disruptive.
How Can You Plan a Bedroom-Specific Preppy Makeover?
Bedrooms require a slightly different approach because comfort matters as much as appearance.
Prioritize:
- Bed placement
- Mattress comfort
- Bedding
- Nightstand function
- Lighting
- Clothing storage
- Desk or study area
- Decorative elements
Don’t sacrifice practical use for visual styling.
A beautifully styled nightstand that doesn’t have enough room for the things you use every night isn’t actually successful design.
For a more bedroom-focused transformation, see the Preppy Bedroom Makeover guide for additional planning ideas.
How Do You Create a Realistic Before-and-After Transformation?
One of the biggest mistakes is expecting the room to look dramatically different simply because you purchased several new accessories.
Real transformations usually happen through several coordinated changes.
Consider this example.
Before
The room has:
- White walls
- Plain bedding
- Wooden dresser
- Empty wall
- One ceiling light
- Small scattered accessories
Transformation
You:
- Center the bed.
- Remove unnecessary objects.
- Introduce navy and cream.
- Layer the bedding.
- Add a rug.
- Introduce bedside lamps.
- Create a gallery wall.
- Organize the dresser.
- Add one or two personal details.
After
The room now feels:
- More intentional
- More comfortable
- More visually connected
- More organized
- More distinctly preppy
No single change created the result.
The combination did.
What Are the Most Common Preppy Room Makeover Mistakes?
Buying Before Planning
This happens because shopping feels more exciting than measuring a room.
But buying first can create mismatched colors, wrong sizes, and unnecessary expenses.
Better approach: Plan first.
Using Too Many Colors
A colorful room can be beautiful, but if every object introduces another color, the eye has nowhere to settle.
Better approach: Establish a foundation palette and use additional colors sparingly.
Using Too Many Patterns
Preppy style welcomes patterns, but uncontrolled pattern mixing can make the room feel chaotic.
Better approach: Vary pattern scale and repeat colors.
Ignoring Furniture Scale
A large bed in a small room can overwhelm the space.
A tiny rug under large furniture can also look disconnected.
Better approach: Measure before purchasing.
Filling Every Empty Surface
An empty surface isn’t automatically a problem.
Negative space gives important objects room to stand out.
Better approach: Decorate intentionally and leave breathing room.
Making Everything Match
A room where every object is the same color and material can feel flat.
Better approach: Coordinate rather than match.
Copying an Inspiration Photo Exactly
An online room may have completely different:
- Dimensions
- Windows
- Lighting
- Ceiling height
- Furniture
- Storage needs
Use inspiration photos for principles rather than exact duplication.
How Do Professionals Make a Preppy Room Look Cohesive?
Professionals generally don’t judge each item independently.
They consider relationships.
For example:
Navy bedding
connects to
navy artwork
which connects to
navy cushion
while
brass lamp
connects to
brass frame
and
natural wood furniture
connects to
wooden accessories.
This creates repetition.
The room doesn’t need identical objects.
It needs recognizable relationships.
Use a Limited Number of Repeated Elements
Choose two or three characteristics to repeat.
For example:
- One major color
- One material
- One pattern
Or:
- Navy
- Brass
- Stripe
Then distribute them throughout the room.
This is one of the easiest ways to make a room feel professionally considered.
How Should You Style the Final Accessories?
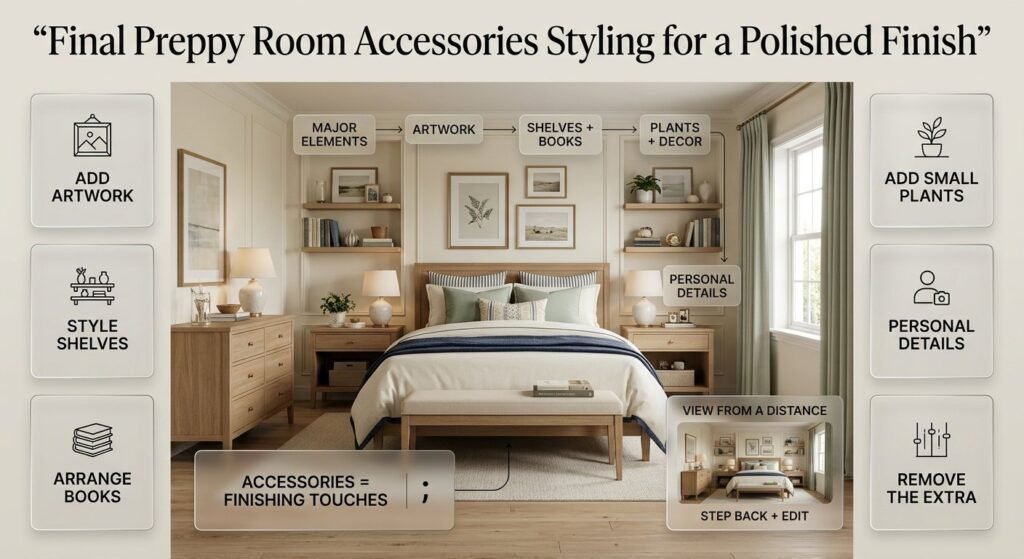
Accessories should come last.
This is important.
If you style the accessories first, you’ll probably have to move them repeatedly as the rest of the room changes.
Start with major elements.
Then:
- Add artwork
- Style shelves
- Arrange books
- Add small plants
- Introduce decorative objects
- Add personal details
- Step back
- Remove anything unnecessary
Think of accessories as punctuation.
They should finish the room, not carry the entire design.
How Do You Know When to Stop Decorating?
This is one of the most important questions.
A room doesn’t become better simply because you continue adding things.
Stop when:
- The main colors are balanced.
- Furniture feels comfortable.
- Storage works.
- The walls have enough visual interest.
- Lighting works at different times.
- The room feels personal.
- Surfaces aren’t unnecessarily crowded.
Then live with the room for a few days.
You may discover that something needs to be removed or repositioned.
That final editing stage can make a surprisingly large difference.
How Should You Photograph the Before and After?
If you’re documenting your makeover, consistency matters.
Take the before and after photographs:
- From similar positions
- At similar heights
- With similar camera orientation
- Under reasonably similar lighting conditions
Avoid taking the before picture from an awkward angle and the after picture from the best possible angle.
The comparison should be honest.
Photograph the entire room first.
Then capture smaller improvements:
- Bed
- Desk
- Gallery wall
- Dresser
- Reading area
- Storage
This gives you a complete record of the transformation.
A Complete Preppy Room Makeover Before-and-After Checklist
Before you begin:
Planning
- Photograph the room.
- Measure the space.
- Identify problems.
- Decide what stays.
- Choose a design direction.
- Establish a color palette.
- Set a realistic budget.
Layout
- Position the largest furniture first.
- Check walking paths.
- Check door and drawer clearance.
- Consider natural light.
- Create a clear focal point.
Color
- Choose a dominant color.
- Select supporting colors.
- Choose a small accent.
- Repeat important colors.
Textiles
- Choose bedding.
- Consider curtains.
- Add a suitable rug.
- Layer throws and cushions.
- Control pattern scale.
Walls
- Choose artwork.
- Consider a gallery wall.
- Add a mirror if useful.
- Check artwork scale.
- Avoid filling every wall.
Lighting
- Check general lighting.
- Add task lighting.
- Consider ambient lighting.
- Place lamps where they are useful.
Finishing
- Organize surfaces.
- Add personal details.
- Repeat materials and colors.
- Remove unnecessary objects.
- Photograph the finished room.
What Does a Professional Before-and-After Transformation Usually Have in Common?
Strong room transformations often share several characteristics.
They solve a problem first.
They don’t simply add decoration.
They improve function.
They create a clearer focal point.
They establish a controlled palette.
They use textiles to add depth.
They make better use of walls.
They improve lighting.
They organize clutter.
And finally, they edit.
This last step is often overlooked.
A room can look better after removing three things than after buying ten more.
How do you transform a room into a preppy room without replacing all the furniture?
A successful preppy transformation starts with the room you already have. Instead of replacing furniture immediately, focus on the elements that create the strongest visual change: layout, color, bedding, lighting, wall decor, and accessories. A basic wooden dresser or existing desk can often work beautifully once the surrounding colors and styling are improved. The goal is to create coordination rather than make every piece look brand new.
Before buying anything, rearrange the furniture, remove unnecessary clutter, and decide which pieces genuinely work with your planned style. Then introduce classic preppy elements such as stripes, plaid, gingham, framed artwork, brass details, natural wood, and a controlled color palette.
Practical points:
Keep furniture that is functional and correctly scaled.
Rearrange the room before deciding what needs replacing.
Update bedding and textiles before investing in major furniture.
Use artwork and accessories to establish the preppy character.
Repeat colors and materials so older and newer pieces feel connected.
Replace furniture only when its size, condition, or function creates a genuine problem.
What colors work best for a preppy room makeover before and after?
The strongest preppy makeovers usually begin with a controlled color palette rather than a collection of unrelated colors. Classic combinations such as navy and cream, blue and white, sage and warm white, or soft blue with natural wood can provide a timeless foundation. Accent colors can then be introduced through bedding, artwork, cushions, rugs, and smaller decorative details.
The important part is not choosing a specific “preppy” color. It’s creating a clear hierarchy between dominant, supporting, and accent colors. For example, cream can cover the larger surfaces, navy can provide visual structure through bedding or furniture, and sage or brass can appear in smaller details.
Professional approach:
Choose one dominant background color.
Select one or two supporting colors.
Use stronger accents in smaller quantities.
Repeat important colors in at least two or three areas.
Use natural wood or warm neutrals to soften stronger colors.
Avoid giving every decorative object a completely different color.
Test the palette in both natural and artificial lighting before committing.
A well-planned palette can make an existing room feel completely different without requiring major structural changes.
How can you make a preppy room makeover look expensive without spending too much?
A polished preppy room is usually created through proportion, consistency, and careful editing rather than simply buying expensive furniture. The biggest improvements often come from choosing appropriately sized furniture, layering textiles, coordinating finishes, improving lighting, and removing unnecessary clutter. A room with fewer well-selected elements can look more refined than one filled with inexpensive decorations.
Start with the pieces that occupy the most visual space. A well-styled bed, properly positioned rug, coordinated curtains, suitable lighting, and appropriately scaled artwork can have a much greater impact than a large collection of small accessories.
High-impact improvements include:
Layering the bed with coordinated textiles.
Using one or two strong patterns instead of many competing patterns.
Repeating finishes such as brass or natural wood.
Choosing artwork that is properly scaled to the wall.
Improving lighting with bedside or task lamps.
Organizing visible storage and everyday clutter.
Using cushions, throws, and curtains to add texture.
Leaving some surfaces intentionally clear.
The professional-looking effect comes from making the room feel intentional. You don’t need every item to be expensive; you need the important elements to work together.
What should you change first during a preppy room makeover?
Start with the room’s foundation rather than its accessories. Decluttering and furniture placement should come before buying decorative items because the layout determines how much space you actually have and where the major visual elements will sit. Once the layout is working, establish the color palette and then move toward bedding, lighting, wall decor, and finishing accessories.
A useful sequence is to photograph the original room, remove unnecessary items, test the furniture arrangement, and identify what genuinely needs to change. This prevents you from spending money on pieces that later turn out to be the wrong size, color, or location.
A practical makeover order is:
Declutter the room.
Evaluate the existing furniture.
Improve the furniture layout.
Establish the color palette.
Update major textiles.
Improve lighting.
Add wall artwork or other focal details.
Introduce patterns and textures.
Style shelves and surfaces.
Remove anything that still feels unnecessary.
This order is particularly useful for a before-and-after project because every stage builds on the previous one. It also makes the final transformation easier to see because you’re improving the room systematically rather than changing random details.
What are the biggest mistakes to avoid in a preppy room makeover?
The most common mistake is treating a makeover as a shopping project instead of a design project. Buying attractive items individually can quickly create a room where the colors, patterns, furniture, and accessories don’t relate to each other. Other frequent problems include using too many patterns, overcrowding surfaces, ignoring furniture scale, and copying an inspiration room without considering the actual dimensions and needs of your own space.
Another mistake is changing too much at once. When everything is replaced simultaneously, it’s difficult to know which changes actually improved the room. A more professional approach is to build the design in layers and evaluate the space after each major stage.
Avoid these common problems:
Don’t buy decor before deciding on the overall palette.
Don’t use several large patterns in the same visual area.
Don’t fill every empty wall or surface.
Don’t choose furniture without measuring the room.
Don’t assume every piece needs to match.
Don’t copy an inspiration photograph exactly.
Don’t replace useful furniture simply because it’s older.
Don’t ignore lighting when evaluating the finished room.
Don’t keep adding accessories when the room already feels complete.
Don’t sacrifice practical storage or comfortable movement for appearance.
The final editing stage is especially important. Once the makeover is finished, remove anything that feels unnecessary or disconnected. In many professional-looking rooms, the last improvement isn’t another decoration—it’s creating enough visual breathing room for the important elements to stand out.
Conclusion
A successful preppy room makeover is not about replacing everything or spending a large amount of money. It is about making thoughtful changes that improve the room’s color balance, layout, furniture arrangement, lighting, textiles, and decorative details. When these elements work together, the difference between the before and after can feel significant even when many original pieces remain.
Start by identifying what the room actually needs, then prioritize the changes that will have the greatest visual impact. A coordinated color palette, better furniture placement, layered textiles, carefully selected patterns, and a few meaningful accessories can create a polished preppy atmosphere without making the space feel crowded.
Whether you are planning a complete transformation or making gradual updates, focus on consistency rather than perfection. Use the existing room as your starting point, make practical improvements step by step, and allow your personal style to guide the final details. With the right approach, a preppy room makeover can create a space that feels organized, comfortable, stylish, and genuinely personal.